

Grading Instructions
Grading Instructions
All student grades must be submitted on the Monday after the end of term by 12:00 midnight.
Grades are the responsibility of the instructor-of-record and should be entered via the faculty tools in MyMSU. In rare cases, a roster could be made available via the Knox folder system, and the faculty could enter grades on the roster and upload the roster back to Knox. Contact the Office of the Registrar before the final week of the semester if you require consideration for a roster to be posted to Knox.
Do not leave grades blank or unentered. Any missing grades can delay the processing of all end-of-term processes (GPA calculation, academic standing, degree awarding, transcript release, etc) for all students.
If a student hasn’t been attending but hasn’t dropped the class, the instructor is encouraged to post the grade that the student had earned after calculating all assignments, projects, papers and presentations. If that grade is an, “F” please also record the last date of attendance. Do not leave grades blank!
If a student's grade record is left blank after 8:00 am on the Tuesday after commencement, the grade will be manually converted to an “NR”, not reported. The instructor will be required to submit a grade change form for each individual student whose grades were late or missing.
Effective summer 2025, we have enabled "email verification" on the grade change Powerform. This will, based on the individual starting the Powerform, send a verification code to the email address entered as the Powerform "Requestor" which then allows the code to be entered to start that Powerform.
Montana State University follows federal policy and requires instructors to report a student’s last date of attendance (LDA) for all courses resulting in a “W” or “F.” Instructors will not be able to submit their roster at the end of the semester without reporting last date of attendance for F or W grades.
How to Check When a Student Last Accessed Your Canvas Course to Report LDA
If you need to verify when a student last accessed your specific Canvas course (rather than just Canvas overall), there are a couple of built-in tools available:
Option 1: New Analytics (Best for Overall Activity and Trends)
- Go to your Canvas course homepage.
- On the right-hand side, click New Analytics.
(If you don’t see this link, go to Settings > Navigation, drag "New Analytics" into the active section, then click Save.)
- In New Analytics, click the “Students” tab at the top.
- Use the list or search bar to locate the student.
- Click the student’s name to open their individual activity dashboard.
What You’ll See:
- Last Page View: The most recent time the student viewed any part of your course (pages, assignments, files, etc.).
- Last Participation: The most recent time the student "took action" (submitting an assignment, replying to a discussion, etc.).
- Weekly Online Activity: A graph showing page views and participation over time.
“Last Page View” is typically the most useful if you’re trying to confirm whether a student has accessed the course recently, even if they haven’t submitted anything.
Important Note:
There’s a 24-hour delay in New Analytics. So, if a student says they accessed something today, it may not show up until the next day. If you're unsure, wait 24 hours before making assumptions, or try the quicker method below.
Option 2: People > View Access Report (Quick per-student Snapshot)
- Go to your Canvas course and click People in course navigation (left-hand menu).
- For each person, you can see their "last activity" listed off to the right. (You won't see this if a student has dropped the class)
- Click the student’s name.
- From the popout, click the student's name again.
- Scroll to the bottom in which you'll see several grey bars.
- From there, click “Access Report.”
What You’ll See:
- A list of course items the student has viewed.
- Number of times viewed.
- Last time viewed (in general terms, not specific timestamps).
This view is more limited than New Analytics but can be helpful in a pinch, especially when you need faster insight into a specific assignment or page.
How to Import Final Grades from Canvas
IMPORTANT- Before you can import final grades from Canvas, you MUST complete steps 1 and 2 to ensure grades are imported correctly.
Step 1- Ensure your class has a grading scheme
Step 2 – Ensure all missing assignments are graded with zeros.
Step 1: Add or Update a Course Grading Scheme
A grading scheme controls how Canvas converts scores into letter grades. If the grading scheme you need is not already available at the account level, you can create one for your course.
Note: A grading scheme will not apply to student grades until it is enabled in the course settings.
Open Course Settings
- In the course navigation menu, select Settings
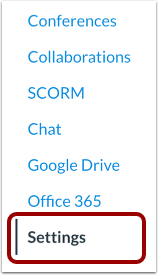
- Select the Course Details tab.

- Select the Enable course grading scheme checkbox.
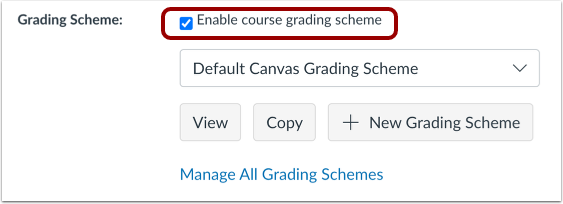
Tip: Enabling this option may apply a default Canvas grading scale. Select View to review the scheme and confirm that it matches your course grading policy.
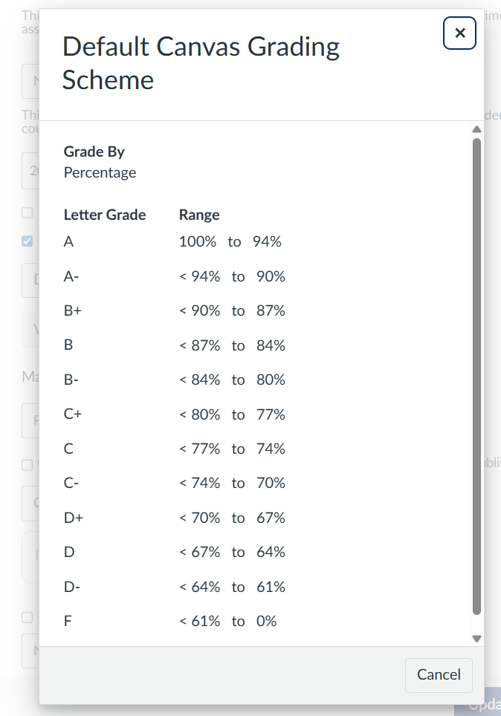
Create a New Grading Scheme
If the default grading scheme does not match your course, create a new one.
- Select + New Grading Scheme.
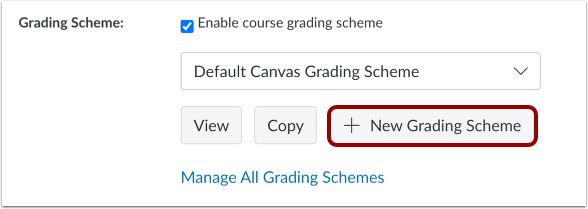
- Enter a name for the grading scheme in the Grading Scheme Name field.
- Choose whether the scheme should use percentages or points.
- Update the grade names and minimum values for each range.
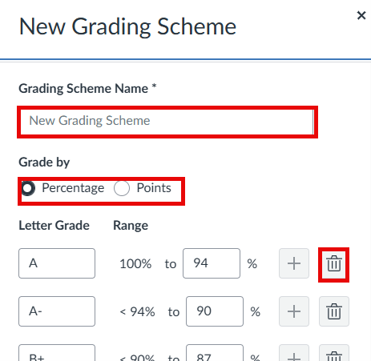
- Add or remove ranges as needed.
- When the grading scheme is complete, select Save.
Important: The grading scheme must cover the full range from 100% to 0%. If you are using points, it must also cover the full range from 100 to 0.
Manage Existing Grading Schemes
After a grading scheme has been created, you can manage it from the course grading scheme area.
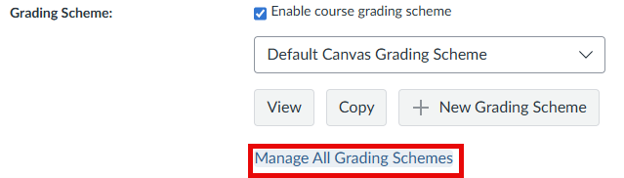
Canvas shows the grading scheme currently enabled in the course, if one is active. To view all available course-level grading schemes, select Manage All Grading Schemes.
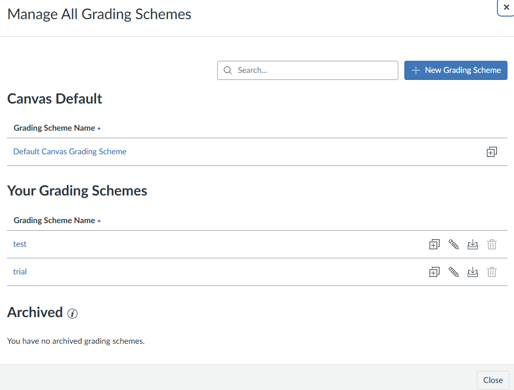
From the grading scheme list, you can duplicate, edit, archive, or delete a grading scheme.
Best Practices
- Review your syllabus grading scale before creating or editing a Canvas grading scheme.
- Make sure the minimum values for each range do not leave gaps.
- Use clear grading scheme names so they are easy to identify later.
- Confirm the correct grading scheme is enabled before final grades are calculated.
Step 2: Ensure All Missing Work is Graded with Zeros
Missing Work and Zeros
- Enter zeros for missing work so final grades are calculated accurately and consistently for all students.
- Assignments marked with the paper icon indicate that grading has not been completed for all submissions associated with that assignment. Be sure to review these items before calculating final grades.
- Blank cells (–) in the Canvas Gradebook are not the same as a 0. They are ignored in grade calculations and can artificially inflate a student's overall grade until a score is entered.
- For example, a student with scores of 90 and 80 would have an 85% average, while a student with a 90 and a blank (–) would temporarily show a 90% because the missing assignment is not yet included in the calculation.
- There are two ways to address missing work:
- Manual method: Enter zeros individually for missing assignments or use the feature to fill all missing fields for a particular activity.
- Automatic method: Use Canvas's Missing Submission Policy to automatically assign zeros for missing work. Keep in mind that this policy does not always apply reliably to certain activities, such as LTIs or assignments without due dates, so those items should be reviewed manually.
1.Grade Pass Back- Import Grades from Canvas to Banner
From the Faculty Tools card in MyMSU, click "Grade Pass-back: Import Grades from Canvas to MyMSU."
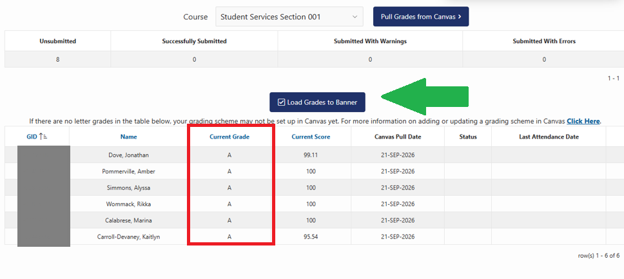
Select the class you are grading from the drop down and click “Pull Grades from Canvas.”

Grades for each student will populate. If grades do not load, double check that you’ve assigned a grading scheme.
Entering Last Date of Attendance for W’s and F’s
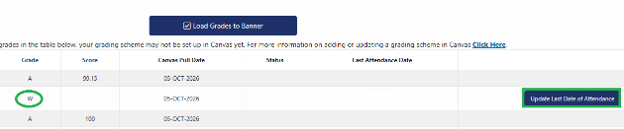
Last date of attendance (LDA) is federally required to be provided by the course instructor for every W and F. Click the button labeled “Update Last Date of Attendance” to enter the LDA for each student with a W or an F on your roster.
Assigning an I-Grade (Incomplete) in Pass Back
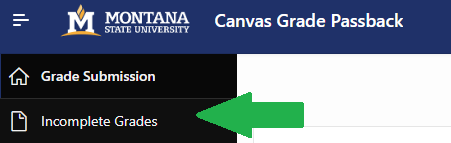
To assign a student an Incomplete, click the Incomplete Grades link at the top, left-hand corner of your screen.
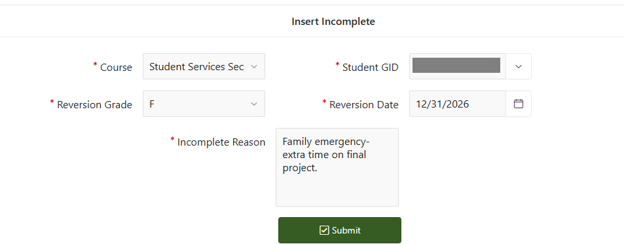
Fill out the required fields and click submit.
Click back to Grade Submission on the top, left-hand side of the screen to submit your grades.
Load Grades to Banner
Once you have updated the LDA for all W's and F's on your roster, click the blue button titled "Load Grades to Banner."
A confirmation window will pop up:
- To load grades to banner, click the green “Load Grades to Banner” button
- To cancel or make changes, click “Cancel.”
- Edit grades in Canvas before attempting to import grades again.
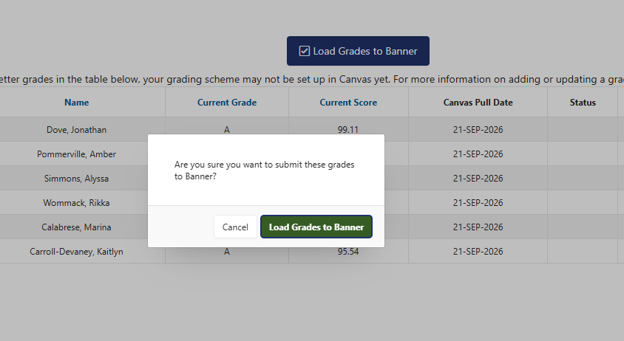
A message will populate in the Status box for all grades successfully submitted with the following message: “Grade” inserted for “GID” for “CRN”.
Double Check Your Work!
- Navigate back to MyMSU and click on Faculty Tools
- Select “Faculty Grade Entry”
- Confirm “Grading Status” displays “Completed.”
You have successfully submitted your grades!

For questions or having issues please contact Jordan Waite at jordan.waite1@montana.edu
- All individuals who are identified as the instructors of record will be able to access their class roster and submit grades through MyMSU. If you need to change who the instructor of record is for your course, please email coursescheduling@montana.edu. To access your course and submit final grades:
- Navigate to montana.edu and login to your MyMSU account
- Navigate to the Faculty Tools
- Select Faculty Grade Entry
Navigation and Filtering
- Courses are sorted by CRN but you can sort any column in ascending or descending order by clicking on the arrows at the top of the column. You can only sort by one column at a time.
- You can Rearrange the columns by dragging and dropping the columns to re-order.
- You have 60 minutes to enter the class grades. We recommend saving frequently to ensure that you do not get a “time out” error.
- Grades can be easily changed as long as you make edits prior to midnight the Monday after commencement. Once grades have rolled to academic history, a grade change form is required to make any updates.
Navigation Information
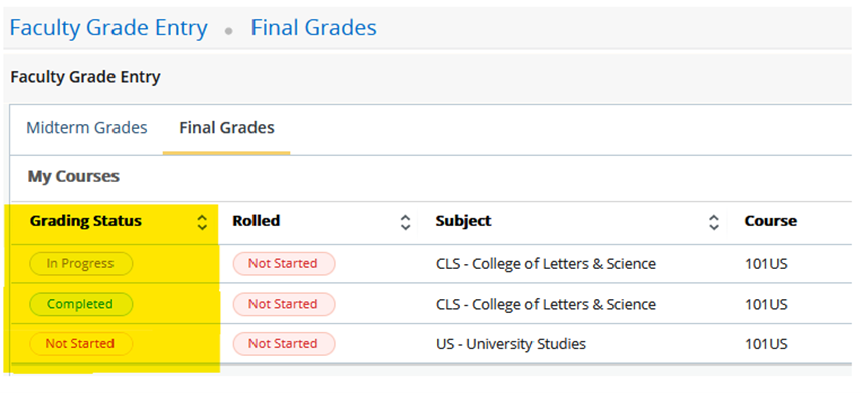
- Grading Status: The grading status column shows the grading status of your rosters.
- Completed: All grades have been successfully entered
- In-Progress: Some grades have been entered but the roster is incomplete
- Not Started: Roster has not been graded
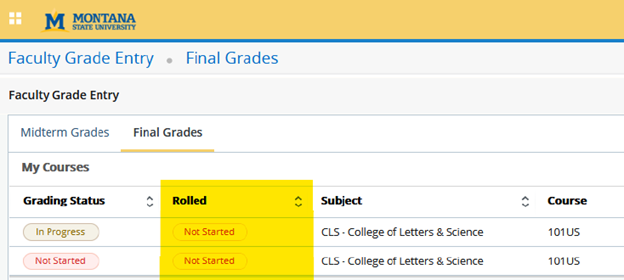
- Rolled Grades: Please note, the Registrar’s Office rolls grades. You can make edits
to your roster until grades have been rolled.
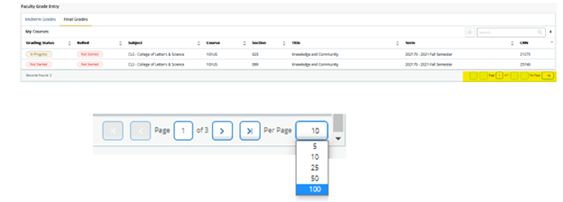
- Pagination Controls: If you teach multiple sections, you may want to utilize pagination
controls to change the per-page display to navigate through all pages. The default
is set to show 25 students per page:
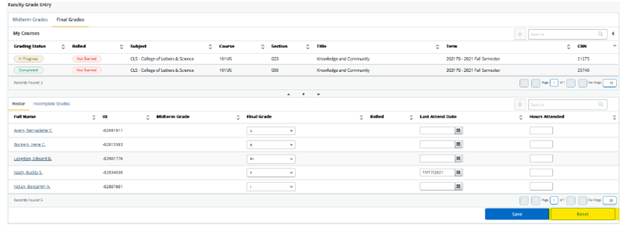
- To begin grading, select the class you would like to grade. Once the course is selected, the roster will populate below. Scroll down to the roster and in the Final Grade column, click the drop-down box and select the grade the student earned.
- Save early and often! You do not have to submit all of your grades at once but you must click “Save” to save your progress. A confirmation message that says “Save Successful” will appear in the upper right corner of the screen after grades have been successfully saved.
- You do not need to fill out the "Hours Attended" column
- The Reset button will clear all unsaved grades, making it easy to start over, if needed. Please note, it is right next to the save button. Click carefully.
Tips and Tricks
- Entering “I” Grades
- Instructors may assign a grade of "I" (Incomplete) when students have successfully completed at least 75% of the coursework, are unable to complete their academic obligations because of circumstances beyond their control, and have agreed to the conditions of completing the I grade set out by the instructor. The University takes the position that when students register, they commit themselves to completing their academic obligations as their primary responsibility. Therefore, the instructor may assign an I grade only in cases when students have suffered extreme personal hardship or unusual academic situations.
- When an incomplete “I” grade is assigned, the instructor will be prompted to adjust the incomplete final grade (if the student took no further action, what would their grade be now? Generally an F) as well as the extension date (date in which the student must submit all remaining assignments and a final grade will be submitted).
- Additionally, instructors must enter a “narrative grade comment” documenting the conditions
the student must meet to have the I grade changed to a traditional letter grade:

- Not seeing your classes? Make sure you’re in the correct semester! On the Faculty Tools, click “Term Selection” and select the term you wish to submit grades.
- The Registrar’s Office will roll grades (the week that grades are due).
- An asterisk next to a grade means the course is not college-level and does not count in the student’s GPA.
- Courses taught as Pass/Fail must only be graded with P-Pass or F-Fail grades.
- Courses taught as Traditional must be graded with traditional grades, ex: A, B, C+, D.
- Faculty may not enter “AU”.
- Faculty may not enter “W”.
- We often get phone calls from faculty inquiring how to grade a student who failed
to drop their class but stopped attending early in the semester. If the student is
still on your roster, please grade them with the grade they have earned (generally
an F). Rest easy knowing there are procedures and systems in place to assist students
who have experienced extraordinary circumstances that impact their academic performance.
- Gradebook Filter:
- Navigate to Grades in your course menu.
- Click the three dots (Options) next to the "Student Name" column header.
- Select Inactive enrollments and Concluded enrollments. This will make dropped students visible in your list with a gray "inactive" or "concluded" tag.
- People Page:
- Check the People page; inactive students often remain visible here with an "Inactive" status label.
- If they are not visible, click the Options icon (three dots) at the top right and select View Prior Enrollments.
- Finding the Specific Date: Once the student is visible again, use these steps to find their last interaction:
- Gradebook Filter:
-
-
- Last Activity Column: On the People page, the "Last Activity" column will display the most recent timestamp recorded before they were removed.
- User Access Report: Click on the student's name, then click it again on their "Context Card" to open their profile. Select Access Report to see the exact date they last viewed specific course content.
- New Analytics: If enabled, click New Analytics from the course home page, select the Students tab, and search for the student to find their Last Participation Date.
-
Troubleshooting
If you are having trouble submitting your grades or experiencing an issue not addressed in these instructions, please email Kandi Gresswell at kandi.gresswell@montana.edu or Tony Campeau at tcampeau@montana.edu with the information below:
- CRN
- Description of issue encountered
- What were you doing when it occurred (Examples: Issuing an I grade, entering last date of attendance)
- Error received (please send a screenshot, if possible)
- Date and time of error
- Name of the browser being used