Submission Views
Quiz Submission Views display quiz related information after quiz submission.
Quiz Submission Views can be modifed to allow different information to be released to the learners as needed.
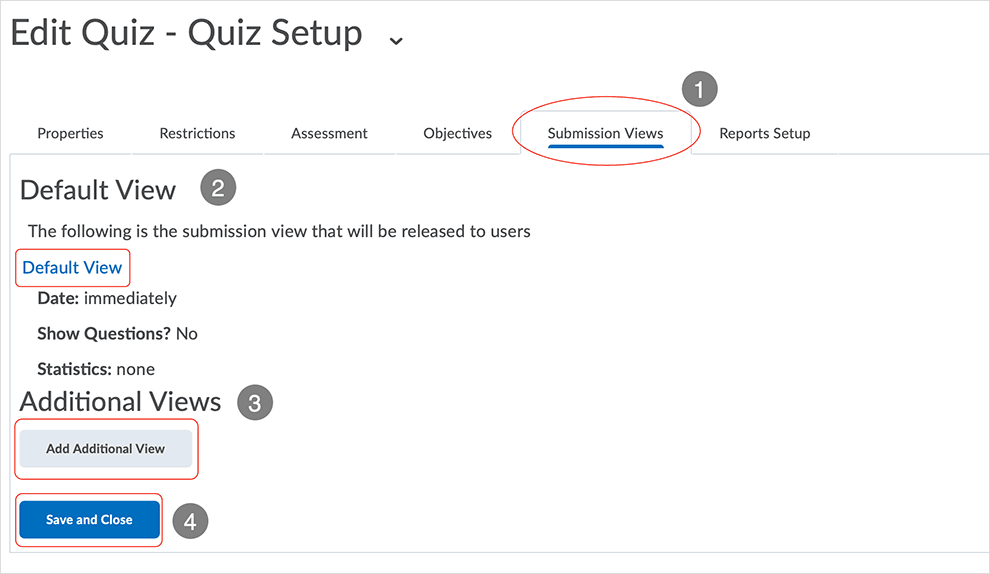
Submission Views tab: Default set
The "Default View" is set to deploy immediately upon a quiz submission, there is no date/time adjustment capabilities in the set. In the "stock" "Default View" set, learners cannot view questions and/or answers, but do receive a quiz "out-of" score.
The "Default View" can be modified by selecting and then editing the "Default View" set, but leaving "Default View" as is and then modifying a quiz submission view by using "Additional View" allows for greater flexibility.
Submission Views starts with a "Default View" in place.
- The Submission Views tab is active.
- "Default View" is in place initially.
- select "Default View" link to access the settings if necessary
- "Additional Views" is used to add another view.
- typically, the default view, with basic information related to quiz score, is left in place and augmented, after quiz end date, with an additional view that details quiz taker responses
- Select "Save and Close" after changes are made.

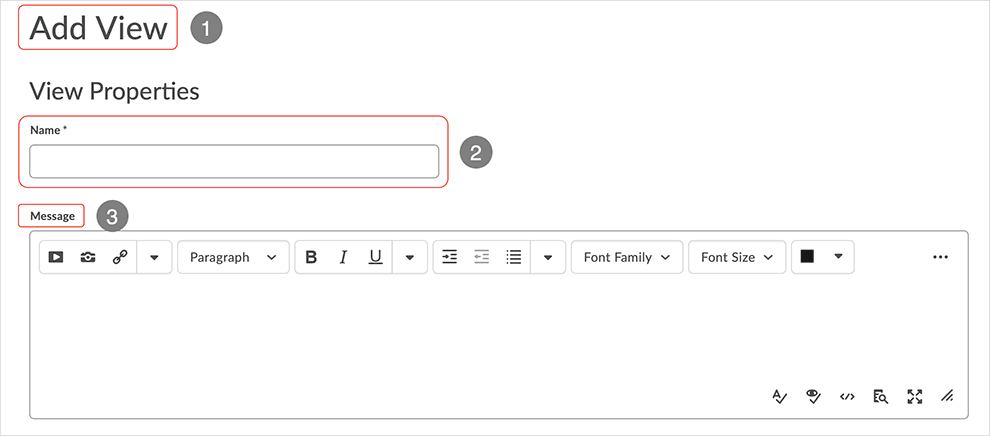
Submission Views tab: Add View > View Properties
After selection of the "Add Additional View" button, the "Add View" page displays.
Under "View Properties" add a name and, optionally, a message about the additional view.
- The "Add View" page is active.
- Enter a "Name" (required) for the additional view being created.
- A message can be added - viewable by the instructor.

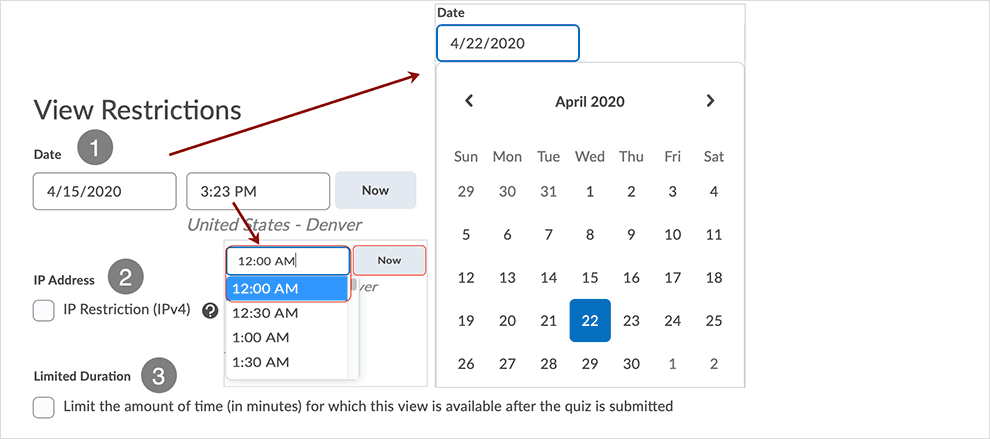
Submission Views tab: Add View > View Restrictions
"Add View" page gives control over when the additional submission view displays.
Under the "View Restrictions" area, set availability parameters of the additional view being created.
- Set the Date and Time that the view will be released to the quiz takers.
- select dates from the calendar - toggle through the calendar
- or enter the date in using the mm/dd/yyyy form
- pick the time from the drop menu revealed when selecting the time box
- select "Now" to release the additional view right away
- select dates from the calendar - toggle through the calendar
- Add an "IP Restriction (IPv4)" for the additional view by selecting the available checkbox.
- Select the "Limited Duration" checkbox to limit how long the submission view is available
to quiz takers immediately after completing the assessment.
- Select the "Limited Duration" box if you want learners to only be able to access the submission view for a short period immediately after completing the quiz.
- Do not use "Limited Duration" if the purpose of the Submissions View is to let students review at a future date (e.g., at an in-class review a week later, after all other students have submitted).

Note: Instructors who want to let learners review quiz submissions at a future date using an Additional View, and wish to reveal answers to questions for a limited length of time (like, say, 120 minutes), can add another Additional View with a "Date/Time" restriction that takes place 120 minutes later than the original, first, Additional View. In the secondary Additional View (same date, but set to open 120 minutes later than the first view), the submission View Details are set to "No" for the "Show Questions?" area. This secondary Additional View will supersede the first Additional View, and effectively turns off access to quiz answers revealed via the "Show Questions?" ("Yes") set up of the first view.
Advertise the opportunity by letting the class know availability date/time of the “opening” of the submission view for study purposes.
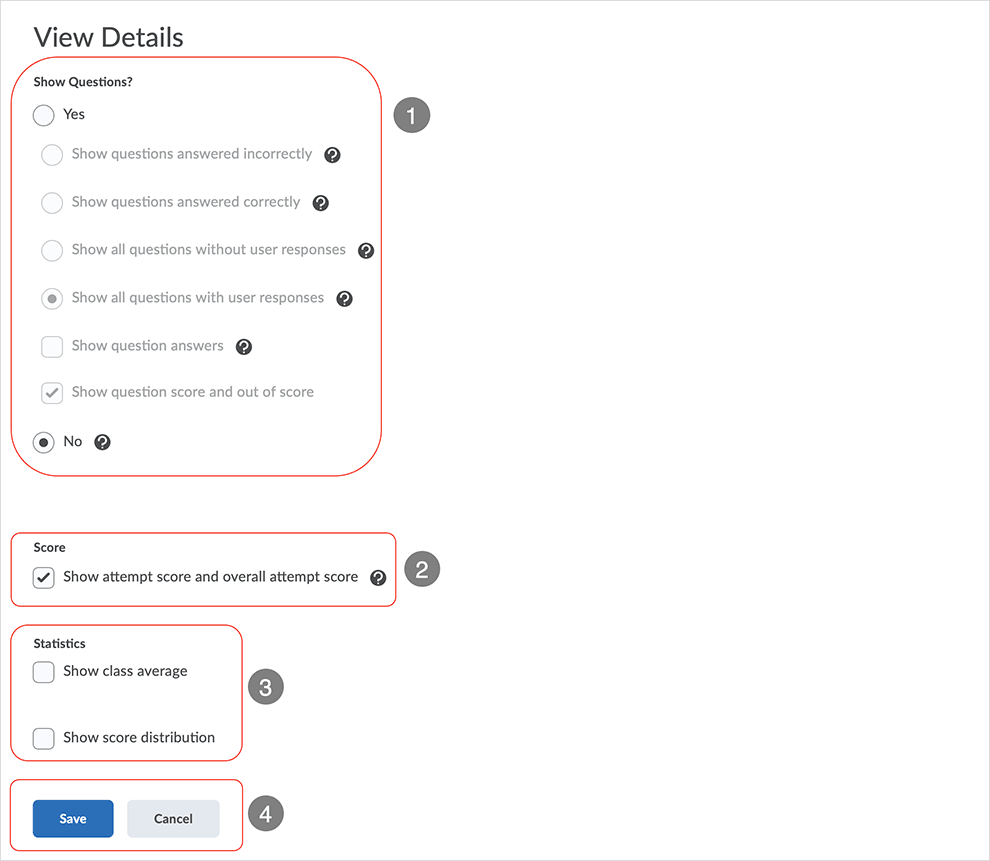
Submission Views tab: Add View > View Details
"Add View" page gives control over what details the additional submission view displays.
Under the "View Details" area, adjust the view that users will see after a quiz has been submitted.
- "Show Questions?" area delivers the ability to set what quiz takers can view when
the submission displays.
- select the "Yes" radio button to enable selection of a radio button revealing quiz
results detail
- correct or incorrect answers
- with or without user responses
- select checkboxes to add detail to the selected "Yes" view
- "Show question answers" reveals the correct answer to a question
- "Show question score and out of score" reveals what the user scored and could have scored on individual quiz questions
- select the "No" radio button to leave no questions available for view by the user
- select the "Yes" radio button to enable selection of a radio button revealing quiz
results detail
- Select the "Show attempt score and overall attempt score" checkbox to enable users
to see their score.
- the score that is displayed is only what the system can auto-grade
- The "Statistics" area shows class average and distribution. Select checkbox(es) as necessary.
- Select "Save" to save the additional submission view and "Cancel" to exit the area.

Learner Resource - Quiz Submission Views access
Select the link directly below to access a Learner Tutorial about Quizzes Submission View.
https://www.montana.edu/ecat/help/learner_tutorials/quiz_submission_view/index.html
This link can be posted in a course to show learners how to successfully access submission views related to quizzes.
Brightspace Resources
Brightspace resources are available from D2L and MSU.
Brightspace Help tutorials related to Quizzes:
Select this link to access various topics related to Creating and Managing Quizzes
Select this link to access an "Instructor FAQ - Quizzes" page
Videos:
Select this link to access a video playlist from D2L - look at the Quizzing and Surveys Playlist
Select this link to access a D2L produced "Quizzes - Customize Submission Views - Instructor" video
Local support documentation pointing to D2L Help resources and related MSU resources:
Select this link to access an MSU "Quiz Setup" tutorial.
Select this link to access the MSU-Bozeman Brightspace Help page documentation.
Links will open in a new tab or window dependent on browser/OS configuration.
What dialog boxes look like and how dialog boxes and browsers interact is dependent upon the operating system and browser being used. The screenshots in this tutorial may differ from the screen that the user is viewing when performing actions described.
CD 202010
